Welcome to BRB-SeqTools Page
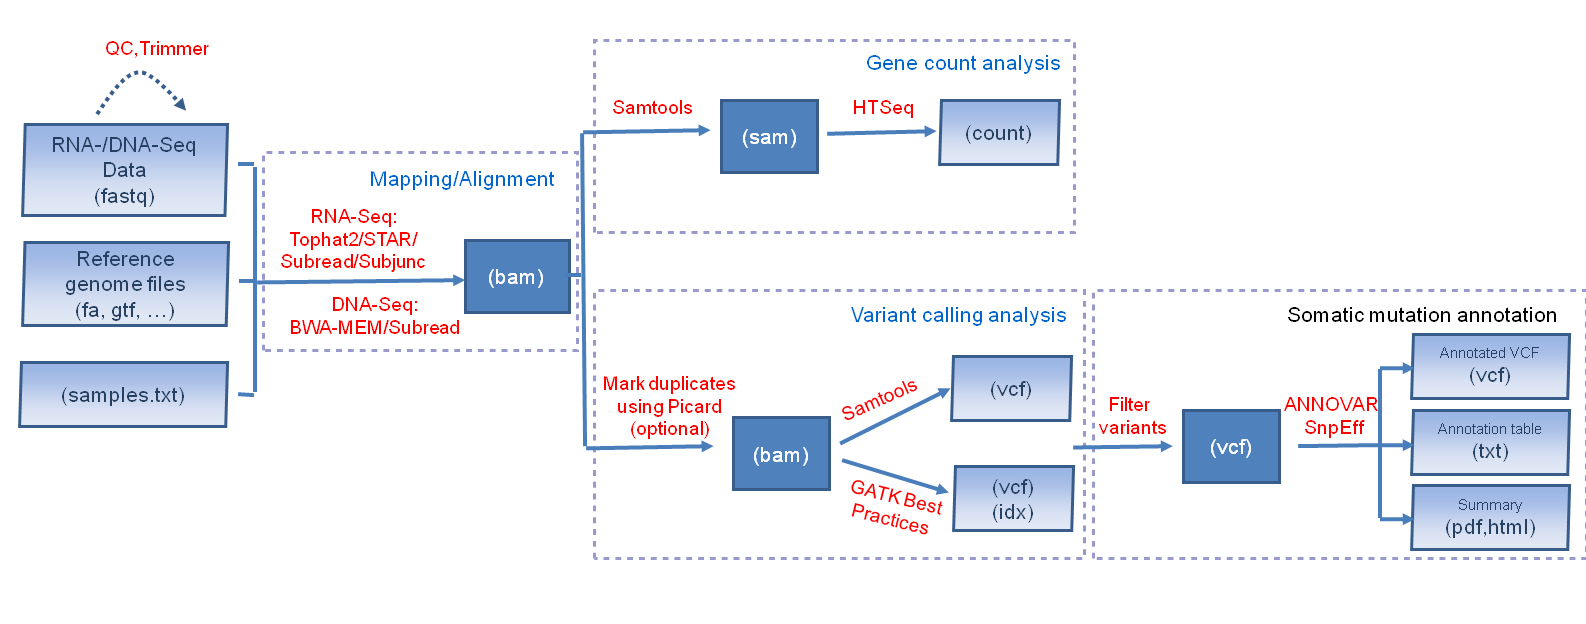
BRB-SeqTools is a user-friendly pipeline tool that includes many well-known software applications designed to help general scientists preprocess and analyze Next Generation Sequencing (NGS) data. It supports the importing and pre-processing of both RNA-Seq and DNA-Seq data, in either FASTQ or BAM file format. For RNA-Seq data in FASTQ format, Tophat or Subread/Subjunc can be used to align the reads to a reference genome. In addition, if sufficient computer memory (>= 32GB) is provided, the user can also choose the STAR aligner to map the reads, which, like Suread/Subjunc, significantly improves the computational speed. BWA-MEM and Subread are provided to align DNA-Seq data. Variant calling analysis can be conducted on both aligned RNA-Seq and DNA-Seq data using Samtools or GATK Best-Practices pipeline tools. For human tumor data, the Variant Call Format (VCF) files generated by the variant-calling pipeline can be filtered and annotated using the somatic mutation annotation tools included in BRB-SeqTools. These tools utilize ANNOVAR or SnpEff to provide gene annotation (e.g. Gene ID) as well as functional annotation (e.g. synonymous or non-synonymous mutation) for each variant, along with predicted effects (e.g., deleterious) of non-synonymous single-nucleotide variants calculated by popular prediction algorithms such as SIFT and Polyphen-2. Additionally, for RNA-Seq data, gene-level raw count data files can be generated using HTSeq. The raw count data can be read into BRB-ArrayTools for gene expression analysis. Currently, BRB-SeqTools can run in the Linux environment on local physical/virtual machines or on remote servers such as Amazon Cloud. An overview of BRB-SeqTools workflow is shown below.
OS & Hardware Requirements
BRB-SeqTools can be run on Ubuntu OS and macOS. We give detailed instructions below for setting it up on each operating system.
The hardware requirement may vary depending on the size of data. It is recommended that the machine has at least 64GB RAM and 2TB hard disk space (See FAQ #1) though a smaller configuration like 4GB RAM and 30GB space is sufficient for running the tutorial data. Note Ubuntu OS itself takes about 4.5 GB hard disk space. BRB-SeqTools and other required software (Tophat2, Bowtie, ...) take less than 800 MB total disk space and the (human) reference genome files take about 20 to 40 GB. If you want to run variant annotation tool, it requires another 15 GB space to download/install relevant database files.
Ubuntu OS
Depending on the machine you have, you can install Ubuntu in different ways. The official installation instruction from Ubuntu provides a step-by-step instruction with screenshots for first-time users. Note only Ubuntu 16.04 and 14.04 are currently supported.
- New machine without any OS (recommended): After a few simple questions have been answered, Ubuntu will start to install to your computer. The whole process of installation takes about 10-20 minutes depending on your hardware.
- Machine with Ubuntu already installed: If your Ubuntu OS version is at least 14.04, you are fine. There is nothing that has to be changed. If your Ubuntu version is below 14.04, you can follow the instruction on the Ubuntu website to upgrade the OS to the latest version.
- Machine with a non-Ubuntu OS:
If you want to install Ubuntu on a machine with an operating system (such as Windows OS) other than
Ubuntu on
it, you have two
choices to install Ubuntu.
- Virtual Machine: Using a virtual machine is a great way to try/use a new OS without worrying about messing up the current OS. The new OS (Ubuntu) will be running at the same time as the current OS. Users can create a virtual machine using software called Oracle VirtualBox (open-source) or VMWARE (commercial) under the current OS. More detailed instructions including step-by-step screenshots can be found on .
- Dual Boot (for advanced users): Ubuntu OS can be installed in a way so that the current OS will be left untouched. It is similar to the virtual machine method but only one OS is running at a time. This approach has the advantage of keeping the current OS but requires more attention at installation. If you plan to take this approach, please back up your data and/or OS license information before the installation. The steps to install Ubuntu for dual-boot are almost the same as those for single boot except you have to choose 'Install Ubuntu alongside Windows 7' in the 'Installation type' dialog. After Ubuntu OS is installed, you can choose which OS you want to boot. Warning: BRB does not assume responsibility for loss of data or any other losses that result from installation, upgrading, or updating of the software.
- Since BRB-SeqTools is primarily used in a GUI environment, you need to have a graphical environment in your Ubuntu OS. If you have a server version of Ubuntu, you can install various desktop environments on it.
- If you wish to install BRB-SeqTools on Amazon Cloud to take the advantage of the clustering power, please use the command line interface programs seqtools_dge/seqtools_vc. See FAQ #6 and #7 below for more information.
- If you have already installed BRB-SeqTools and want to use it remotely from another machine running on Windows OS, the Windows OS needs to have an X11 display server program in order to use BRB-SeqTools. PuTTy and Xming X server are two standard programs for Windows OS users to remotely run GUI programs located on Linux machines. If you are not familiar with these two programs, google with keywords PuTTy and Xming to find more information.
- If the host machine is also running Windows OS, you may want to check the power option (Windows > Control Panel > Power Options) to make sure it won't go to the sleep or hibernate mode when the Windows OS is idle for a long time (with Ubuntu VM still working).
macOS
Starting from version 1.2 Mac users can run BRB-SeqTools on their Mac desktop/server. Since macOS is a little different from the Linux OS, Mac users can take a look of the following guide for more information .
Setting up BRB-SeqTools
Note the software setup instruction here is mainly for Ubuntu users. If you are a Mac user, please refer to the macOS section for more download and setup instructions.
Download BRB-SeqTools
![]() (version 1.2, Ubuntu only)
(version 1.2, Ubuntu only)
The downloaded file <seqtools-dl-1.2.tar.gz > will be saved under $HOME/Downloads directory by default.
The tarball can be extracted to the desktop or any other place under your $HOME directory by using either the file manager (called Nautilus in Ubuntu) or a terminal command (use the keyboard shortcut 'Ctrl+Alt+t' to open a terminal).
tar -xzvf seqtools-dl-1.2.tar.gzThis will create a new directory called seqtools-dl. This new directory contains the following files:
SeqTools: GUI version of the applicationseqtools_dge/seqtools_vc: CLI version of the applicationinstall.sh: script to 'install' the application icon to the right places (Linux only)INSTALL: instruction of using <install.sh> script (Linux only)samples.txt: template of samples.txt (tab-delimited)samples_gatk.txt: template of samples.txt (tab-delimited) for GATK variant callingexamples.txt: examples of using the seqtools_dge/seqtools_vc programsicon: folder containing the application icon (Linux only)code: folder containing scripts required for ANNOVAR/SnpEff
Although it is optional, it is recommended to open a terminal and run ./install.sh to
create a desktop shortcut with the application icon. Note that running install.sh requires sudo
privileges; check it out
here in FAQ.
Launch BRB-SeqTools
To launch the GUI application, you can do one of the following:
- Open the File Manager and go to the directory seqtools-dl.
Double click
SeqToolsfile to launch. -
Open a terminal and go to the directory containing SeqTools.
Type in
./SeqToolsto launch. Don't forget the dot and the forward slash when you run an executable from the current directory!
- Double click the BRB-SeqTools icon
 on the Ubuntu desktop (assuming the script
 install.shhas been run once).
Software Setup
Before running NGS data analyses in BRB-SeqTools for the first time, the user needs to install some software applications (such as Bowtie, Tophat2 and Samtools) required by the program, by clicking on "Settings" -> "Tools manager". The software can be downloaded by clicking the "Automatic Setup" button to run an installation script. Alternatively, the user can choose to manually download the required software applications, instead of running the script. The "Automatic Setup" method is recommended for users with limited experience with Linux.
If you wish to use GATK for Variant Calling analysis, you need to manually download and set up the software in BRB-SeqTools because of the GATK license restriction. The instructions for downloading GATK can be found on here.
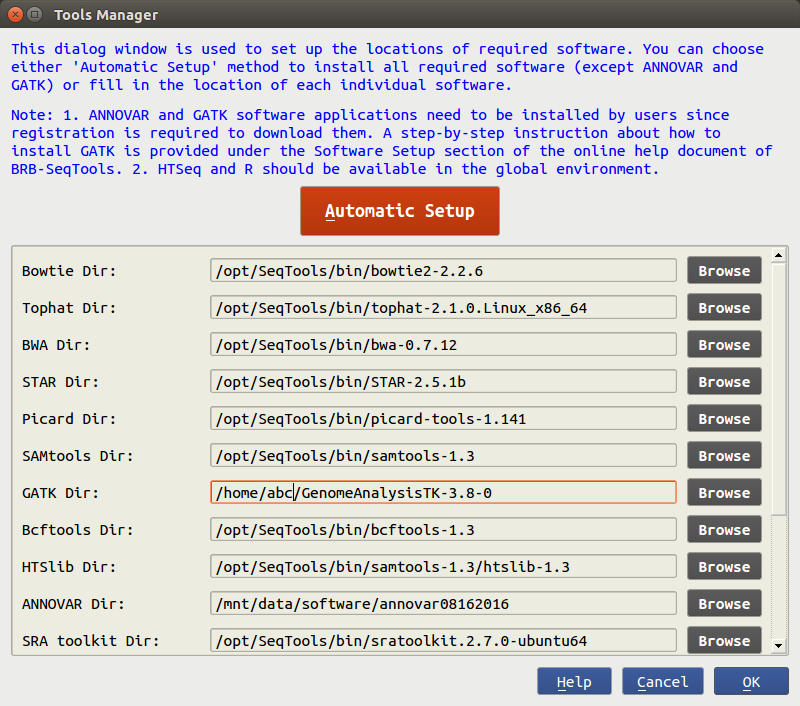
Automatic Setup
The "Automatic Setup" method provides an easy way to install the required software with no license
restrictions.
Upon clicking the "Automatic Setup" button, a new terminal will show up.
The user will then be prompted to enter a sudo password, and the application will start
to
download an installation script
from the internet (which is kept updated) and install the required software.
All the required software is installed under the /opt/SeqTools/bin directory.
Note that if you do not have the sudo password, you need to ask your
system administrator for help. Check it out here in FAQ on how to allow an
existing user
to have root privileges.
After the installation is finished, the user will be asked to press the ENTER key to close the terminal.
Manual Setup
If the required software has been previously installed, you can click the Browse button to select the directory for each software package. It is assumed HTSeq is available under a global environment so there is no entry for it. After the path of each software package has been specified, users can click the 'OK' button to proceed with the main components in BRB-SeqTools.
Note that the required software only needs to be set up once. The path of each required software package will be remembered by BRB-SeqTools.
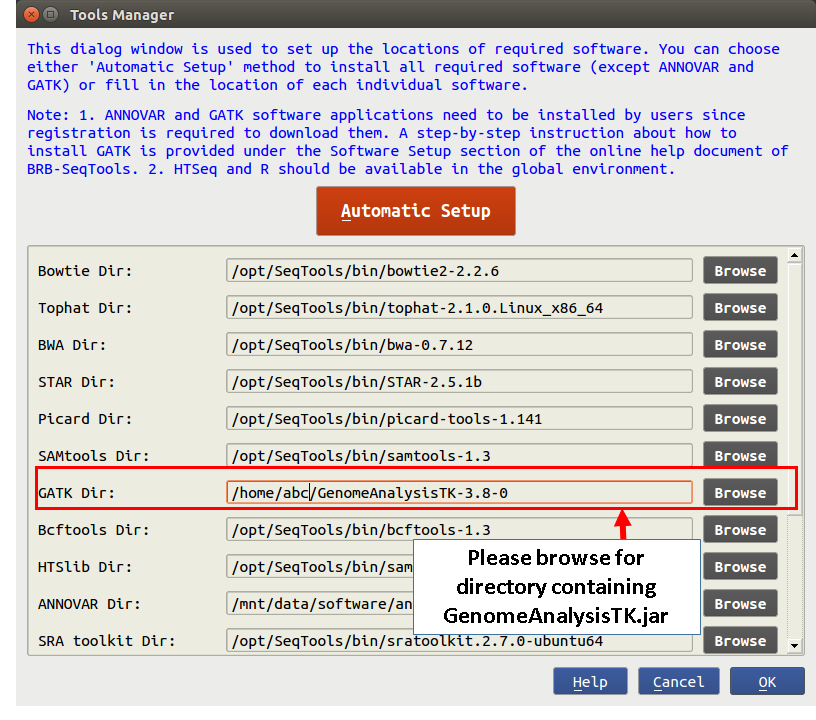
GATK Setup
You are required to manually download and set up GATK in BRB-SeqTools. Before downloading the software, you need to either sign in with your existing Broad account or create a new one. Here is the link to the sign-in and download web page.
1. Log into your account and download the software to you local machine.
2. Browse for the downloaded GenomeAnalysisTK-<version>.tar.bz2 file. Double-click on the .tar.bz2 file to unzip it.
3. Start BRB-SeqTools and go to "Settings" -> "Tools Manager". In the field of "GATK Dir:", browse for a folder that contains the GenomeAnalysisTK.jar file. Click the "OK" button to save the change. Now GATK is ready to use with BRB-SeqTools.
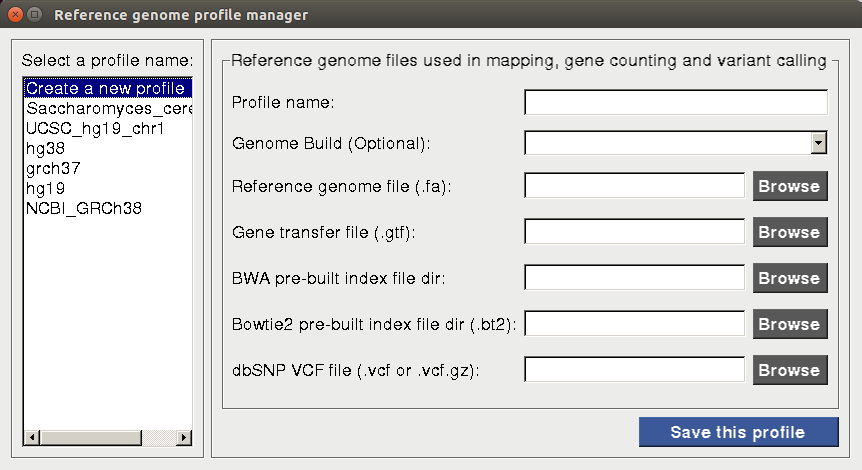
Reference Genome Profile Setup
Reference genome and annotation files are essential for mapping, creating gene counts and calling variants. Before starting alignment or any data analysis in BRB-SeqTools, the user is required to create a new or select an existing reference genome profile, such that the same genome build can be used consistently throughout a particular analysis procedure. To set up the reference genome profile, the user needs to open BRB-SeqTools, go to "Settings" -> "Reference Genome Profile Manager". Upon selecting the "Create a new profile" option on the profile manager dialog page, two buttons will show up on the right side: "Automatic Setup" and "Manual Setup".
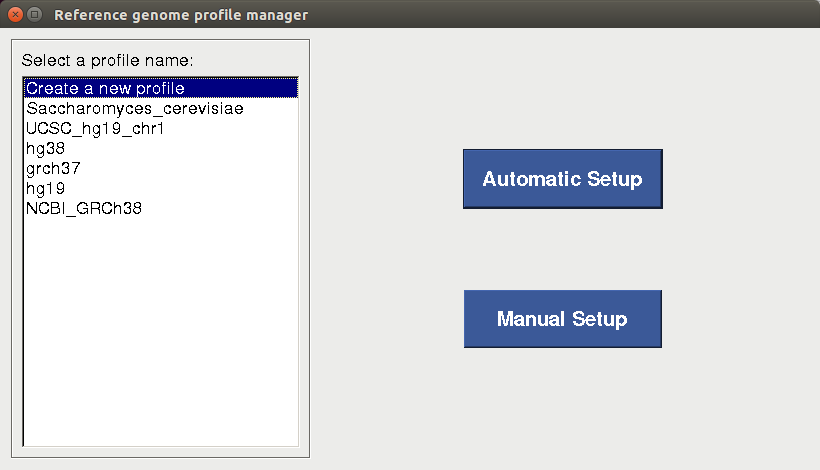
Automatic Setup
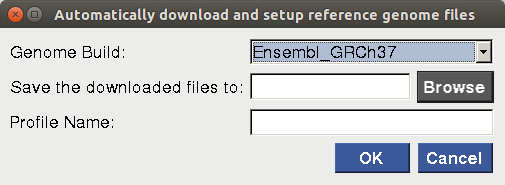
For users who 1) do not have any previously downloaded reference genome files and 2)are planning to use one of the four most common human genome builds (i.e. NCBI_GRCh48, Ensembl_GRCh47, UCSC_hg38 and UCSC_hg19), the "Automatic Setup" option is strongly recommended. After the user selects the genome build, enters the reference genome profile name and browses for the directory to which the files will be downloaded, a terminal will pop up to show the download progress of the files. Depending on the internet speed, it may take a long time to complete the download process. If all the files are downloaded successfully, a profile will be created and saved for future use.
Manual Setup
If the user chooses not to use the "Automatic Setup" option to download the required reference genome and annotation files, he/she can manually download the files from the Illumina iGenomes website. The dbSNP database VCF file can be downloaded at ftp://ftp.ncbi.nih.gov/snp/organisms/. For example, a GRCh47 version of the dbSNP VCF file can be downloaded at ftp://ftp.ncbi.nih.gov/snp/organisms/human_9606_b146_GRCh47p13/VCF/ using a web browser. We recommend to download the common_all version of the dbSNP VCF file. After manually downloading all the required reference genome and dbSNP VCF files on his/her computer, one should choose the "Manual Setup" option and browse for the directories/files. A profile will be created and saved for future use by clicking on "save this profile"
Running BRB-SeqTools
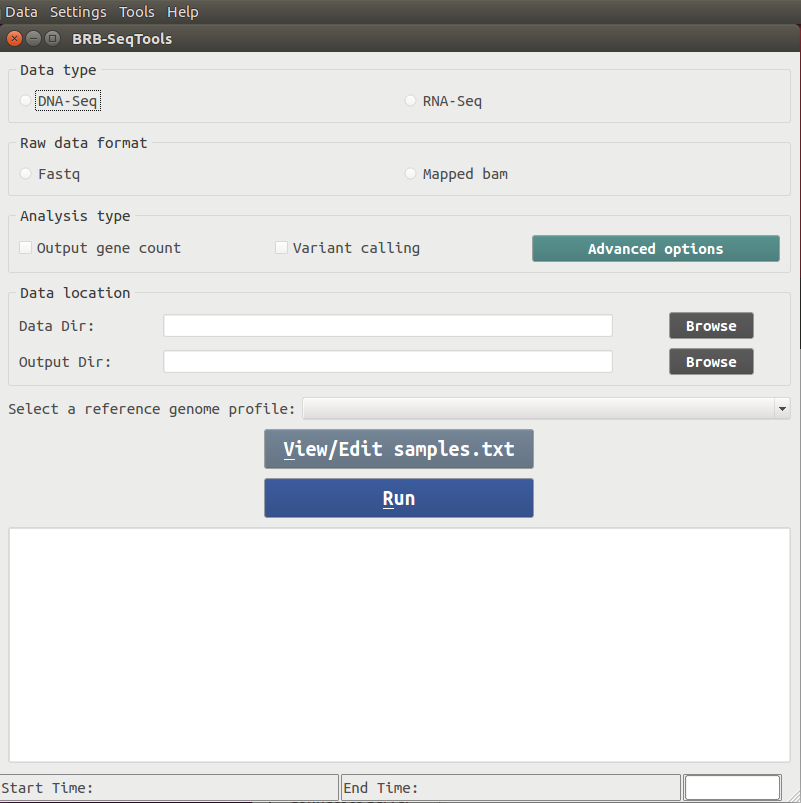
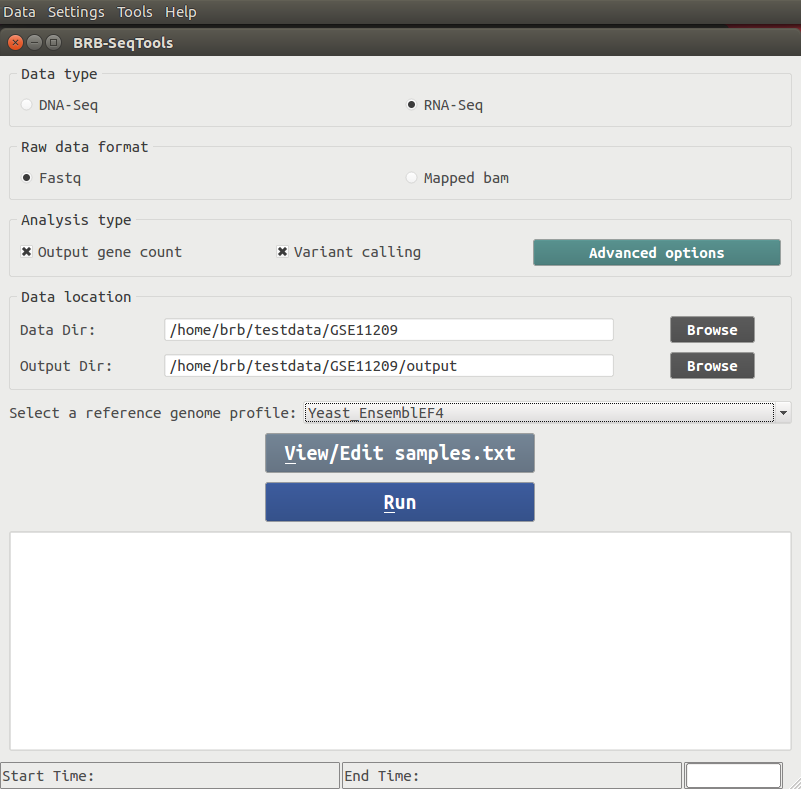
There are four major components included in BRB-SeqTools: Alignment, Gene Counting, Variant Calling and Variant Annotation. Upon starting BRB-SeqTools, a GUI interface shows up to let the user enter information required by the software, such as the data and analysis types, the input and output directories, as well as the reference genome profile. The user is also allowed to view or edit a file called "samples.txt", which contains sample information required by the software. After all the required parameters are entered, the user can click the "Run" button to start the analysis of interest.A screenshot of the main GUI interface is shown below.
Preparing Files
Some input files are required to run BRB-ArrayTools, such as data files in .fastq or .bam format, reference genome files, as well as a sample information file called "samples.txt". The reference genome files are prepared through the "Reference Genome Profile Setup" procedure. It may take extra steps to prepare data files in .fastq format, and to prepare the "samples.txt" file in required format.
Converting .sra files to .fastq files
The fastq files can be generated from sequencers or public repositories such as the Sequence Read Archive (SRA). If data is obtained from SRA, the data format is in sra which cannot be directly read into BRB-SeqTools. Therefore a program called fastq-dump needs to be run to convert the data format from sra to fastq. An example of using fastq-dump command is
/opt/SeqTools/bin/sratoolkit.2.3.5-2-ubuntu64/bin/fastq-dump --split-3 SRRXXXXXX.sra
This will create one single file called "SRRXXXXXX.fastq" for single-end data or a pair of files named "SRRXXXXXX_1.fastq" and "SRRXXXXXX_2.fastq" for paired-end data. Note that the above command assumes users have run automatic setup tool to install required software. Fastq-dump program is part of SRA ToolKit. The full path to the fastq-dump depends on the SRAToolKit version. See also FAQ #8.
samples.txt
Before starting to run any analysis with BRB-SeqTools, the user needs to construct a table of sequencing design in a tab-delimited file named "samples.txt". This file has the following requirements:
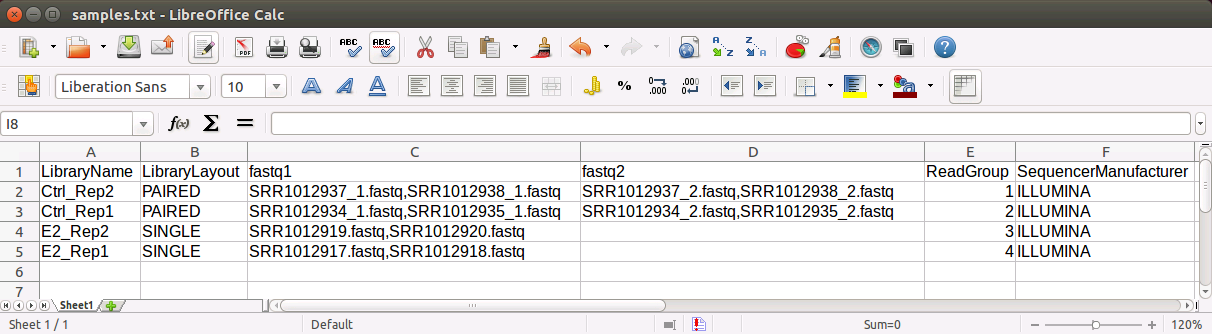
The header of samples.txt consists of LibraryName, LibraryLayout, fastq1,
fastq2,
ReadGroup, and SequencerManufacturer.
Each row represents one sample. The column 'LibraryName' contains a name to uniquely represent the sample.
The 'LibraryLayout' should be PAIRED or SINGLE.
The 'fastq1' column contains the fastq file names. Multiple files can be concatenated by the comma sign.
If the library is paired-end, the 'fastq2' column should be
specified in the same format as the 'fastq1' column. The columns 'ReadGroup' and 'SequencerManufacturer'
are optional and only used if the GATK variant calling method is used. Some common values in the
'SequencerManufacturer' column are ILLUMINA, SLX, SOLEXA, SOLID, 454, LS454, COMPLETE, PACBIO,
IONTORRENT, CAPILLARY,
HELICOS, UNKNOWN. No blank space is allowed in this column.
An example of the samples.txt file is given below:
This file can be edited using LibreOffice Calc (similar to Microsoft Excel on Windows OS) on Ubuntu by:
- Open Nautilus (File Manager). Copy a template of samples.txt from the
seqtools-dlfolder to your working directory. - Right click samples.txt file and select 'Open with Other Application...'.
- Click 'Show other applications' and choose 'LibreOffice Calc'. Press 'Select' button.
- Make sure 'Tab' is checked and 'Comma' is unchecked under 'Separator options' section in the 'Text Import' dialog. Then click 'OK' button.
- Go ahead and modify the file as needed (more information is given below).
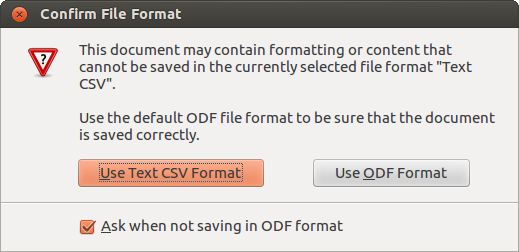
- Click File > Save when it is done. If you see a warning message below, you can click 'Use Text CSV Format' to close the message.
- Close LibreOffice by File > Exit.
- Go to the file manager and make sure the file name is samples.txt. If it is called samples.txt.csv, please rename it to samples.txt.
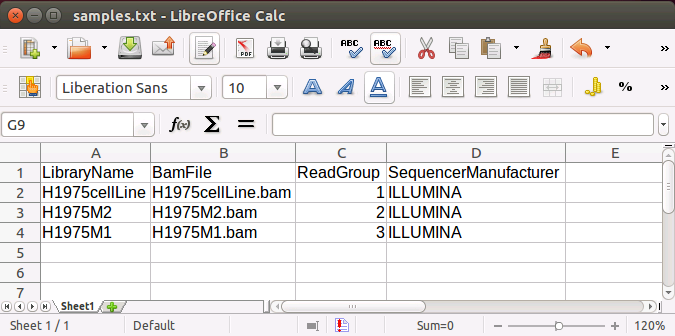
If the input files are in the bam format, the header of samples.txt should be
LibraryName, BamFile, ReadGroup and SequencerManufacturer.
Each row represents one sample. The column 'LibraryName' contains a name to uniquely represent the sample.
'BamFile' should include the filenames for bam files.
The 'ReadGroup' and 'SequencerManufacturer' columns are optional and only used if the GATK variant call
method is used. An example of the samples.txt file looks like:
Mapping/Alignment
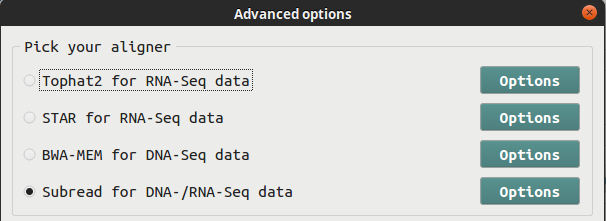
BRB-SeqTools allows NGS data input in either .fastq or .bam file format. If you have .fastq data files, you need to use an aligner to map the data to a reference genome before proceeding with any further analysis. Four aligners are provided, including Tophat, Spliced Transcripts Alignment to a Reference (STAR), Burrows-Wheeler Aligner (BWA) and Subread/Subjunc. If you have RNA-Seq data, you can choose among Tophat, STAR and Subread/Subjunc. For DNA-Seq data, you can choose between BWA and Subread. Below is a screen shot of the interface containing the four aligner options.
Before starting the alignment process, you are welcome to run quality control and trimming by using the FastQC and Fastx_trimmer tools. Both tools are available under the 'Tools' menu.
Input
BRB-SeqTools requires the following files to map your .fastq data.
- Data files in .fastq format
- A gene structure information file in .gtf format
- A reference genome file in .fa format
- Pre-built index files. (Tophat2 requires .bt2 files and BWA requires a .bwt file. STAR will build index files on the run using the .fa file and the .gtf file.)
- A file named "samples.txt". This file is required by the software for certain sample information. We provide a template to help you create this file, which can be downloaded here. More information about this can be found in the Tutorials section.
Output
Regardless of which aligner/mapper you use, BRB-SeqTools produces one BAM file for each sample.
Gene Counting
One of the most common analyses conducted on RNA-Seq data is to generate the summarized read counts on each gene. BRB-SeqTools utilizes the FeatureCounts or HTSeq software to conduct gene count analysis.

Input
The following files are required as input (see also Tutorials section)
- Aligned data files in .bam format. If you only have .fastq data files you need to start with Mapping/Alignment.
- A reference genome file in .fa format.
- A gene structure information file in .gtf format.
- A file named "samples.txt".
Note: To get reliable results, you must use the same reference genome profile in gene counting and mapping.
Output
The gene count output file is a zipped file named "counts.zip". It contains the same number of files
as the number of samples.
Each file is named by the sample name plus an extension "count", and
contains a table of read counts for all genes in each sample. There are two columns in the table.
The first column contains gene identifiers such as Ensembl IDs or gene symbols and the second column has
count values.
These count table files can be imported into BRB-ArrayTools for gene expression analyses.
Alternatively users can use the DESeqDataSetFromHTSeqCount() function from the
DESeq2 package
or the readDGE() function from the edgeR package
from Bioconductor to
load count data into an
R environment.
Variant Calling
In addition to the gene count analysis of sequencing data, variant calling analysis is another approach commonly used to analyze both DNA-Seq and RNA-Seq data. In BRB-SeqTools, the user can choose to use Samtools or The Genome Analysis Toolkit (GATK) to conduct variant calling analysis. Below is a screen shot showing the GUI interface with variant calling analysis options.
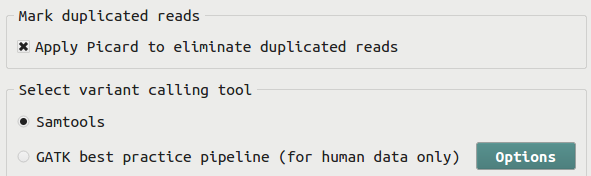
Before calling variants using Samtools or GATK, the user can choose to use the Picard software to mark duplicated reads. This step is recommended only if the sequencing library is prepared using PCR.
There are two variant calling methods implemented in BRB-SeqTools. One is implemented using the Samtools family tools, including Samtools, BCFtools and HTSlib. This method utilizes the multi-allelic caller implemented in Samtools. The other method is implemented by following the GATK Best Practices workflow and consists of several steps, including Split'N'Trim (for RNA-Seq data only), Realign INDELs, Recalibrate Bases, and Call variants using the GATK HaplotypeCaller.
Input
BRB-SeqTools requires the following files as Input to run variant calling analysis on your data.
- Aligned data files in .bam format. IIf you only have .fastq data files you need to start with Mapping/Alignment.
- A reference genome file in .fa format.
- A gene structure information file in .gtf format.
- A file named "samples.txt".
Output
BRB-SeqTools calls variants sample by sample and reports variants, including SNPs and INDELs in a VCF file for each sample. For human tumor sample data, the VCF files can be annotated using the Somatic Mutation Annotator included in BRB-SeqTools.
Variant Annotation
The somatic mutation annotator in BRB-SeqTools is designed for human species only, and is mostly used on human tumor data.
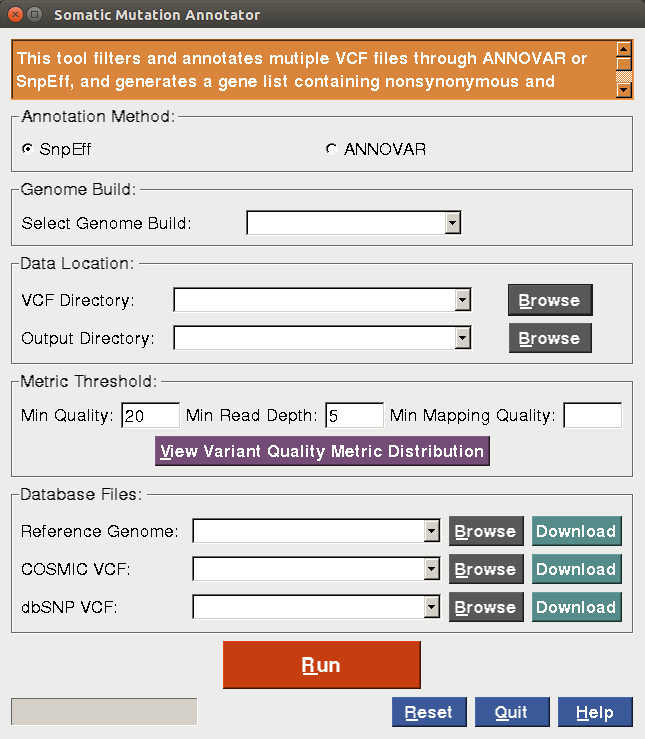
In the somatic mutation annotator tool, two popular variant annotation tools, ANNOVAR and SnpEff, are utilized to annotate variants from one or multiple raw VCF files. This tool takes one or multiple raw VCF files as input, and output for each VCF file a gene list containing nonsynonymous and splicing variants that are not known polymorphisms unless in COSMIC, an annotation table for the detected variants, an annotated VCF file and summary reports. The figure below displays the GUI screenshot for the annotator.
 |
Process
The annotator follows the variant annotation process as shown below:
- We keep those variants that pass the filtering criteria for the variant call quality, read depth and mapping quality.
- We decompose and left normalize the remaining variants.
- We keep those variants reported in COSMIC regardless of those in dbSNP.
- We filter out synonymous variants.
- The remaining variants are annotated through ANNOVAR or SnpEff. The annotation includes gene-based annotation that provides information such as gene name and region as well as functional predictions (e.g., deleterious, tolerated) from the dbNSFP database.
- A gene list, an annotation table and an annotated VCF file associated with the detected variants are generated. Summary statistics are included in the summary reports in .pdf and .html formats.
Download ANNOVAR and SnpEff
One can download ANNOVAR from the ANNOVAR website. Please register first, and then follow its instructions to download ANNOVAR. Afterwards, please unzip the downloaded file to a directory with write permission.
SnpEff will be automatically installed in /opt/SeqTools/bin/snpEff after one has run
"Automatic Setup" in "Settings -> Tools Manager".
Database Files
There are two ways for users to prepare database files required for running the somatic mutation annotator. One way is to manually download all the required database files including reference genome and COSMIC/dbSNP VCF files. The instruction for downloading these files can be found on
The other way is to automatically download these files by clicking on the three "Download" buttons in the annotator. The foldervariantAnnoDatatbase under the user's home directory will be
created to keep these files. One must first select a genome build to download all database files by
following the instructions below:
- Download the genome reference file: Please click on the "Download" button associated with the reference genome file to automatically download the reference genome (.fa) file associated with the selected genome build from the Illumina iGenomes website. It may take a while to finish. Please wait until you get a message indicating successful download. Once the download has completed, the field will be automatically filled in.
- Download COSMIC VCF: Please click on the "Download" button associated with the COSMIC VCF to
automatically download the COSMIC VCF associated with the selected genome build from
the COSMIC database. It will navigate you to
the following window asking you to input your COSMIC account information.
If you haven't registered in COSMIC, please click on the "Register" button to register first. Afterwards, please input the username and password in the window, and click on the "Login" button to automatically download the file. It may take a while to finish. Please wait until you get a message indicating successful download. Once the download has finished, the field will be automatically filled in.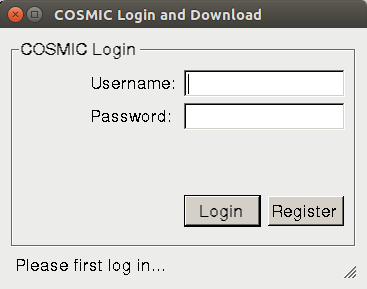
- Download dbSNP VCF: Please click on the "Download" button associated with the dbSNP VCF to automatically download the dbSNP VCF associated with the selected genome build from the dbSNP database. Once the download has finished, the field will be automatically filled in. It may take a while to finish. Please wait until you get a message indicating successful download.
Notice that, once these files have been downloaded for each genome build, they will be pre-populated if one genome build is selected. If one has run the variant calling pipeline using one genome build in BRB-SeqTools, the genome reference and dbSNP files will be pre-populated when the same genome build is selected in the annotator. In addition, the annotator will keep the running history associated with each genome build, and these database files will be pre-populated accordingly for each genome build in the history. Please always take a look at the drop-down list for the database files, and select those you prefer.
Input
The annotator takes the following as input. (see also Tutorials section)
- One directory containing one or multiple raw VCF files in .vcf format.
- One directory keeping outputted results.
- Genome build.
- Minimal variant quality, minimal read depth and minimal mapping quality.
- One reference genome file in .fa/.fasta format.
- One COSMIC VCF file in .vcf/.vcf.gz format.
- One dbSNP VCF file in .vcf/.vcf.gz format.
Output
Suppose one of the raw VCF files in the directory a user has browsed for is named myExample.vcf, the following files will be generated in the user-specified output directory after running either ANNOVAR or SnpEff:
- myExample_genelist.txt: a gene list text file associated with the detected variants.
- myExample_annoTable.txt: an tab-delimited annotation table associated with the detected variants.
- myExample_annotated.vcf: an annotated VCF file associated with the detected variants.
- myExample_summaryReport.pdf: a summary report in .pdf format listing summary statistics.
- myExample_summaryReport.html: a summary report in .html format listing summary statistics.
- log.txt: a log file keeping outputted messages from ANNOVAR/SnpEff or any error/warning messages.
- inputParameters.txt: a file keeping all the parameters for running the variant annotation.
- run_variantanno.sh: a shell script that one can re-ru in terminal to generate the same results.
Please note that the detailed explanation about all column names in the output files such as *_genelist.txt and *_annoTable.txt is available here.
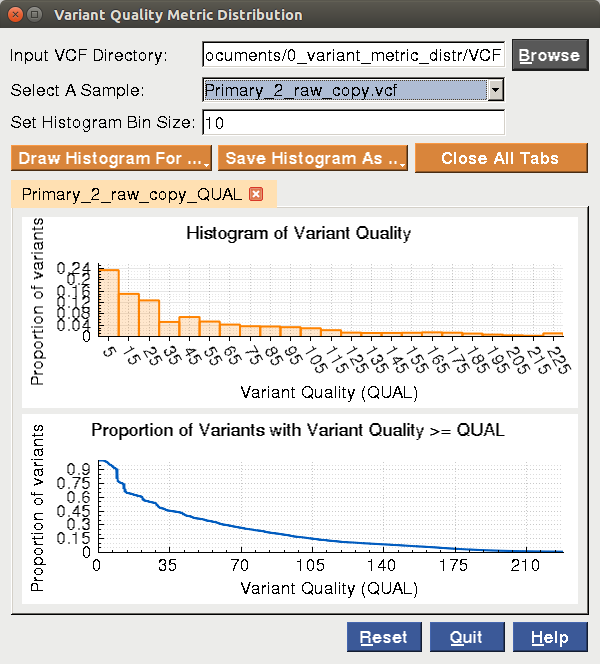
Variant Quality Metric Distribution Tool
BRB-SeqTools also provides a visualization tool called "Variant Quality Metric Distribution" for users to view the histograms or accumulative proportions of variant quality metrics for variant quality score (QUAL), read depth (DP) or mapping quality (MQ). This tool is designed for the purpose of helping users determine appropriate thresholds for QUAL, DP or MQ for VCF files when running the somatic mutation annotator. Below is a screenshot for the tool:
|
In the histogram tool, you need to browse for a directory for one or multiple VCF files. Once the directory has been browsed, all the VCF files inside will be automatically loaded into the "Select A Sample" field. Please select one VCF sample of your interest from the drop-down list. Please set the bin size for drawing one histogram. Afterwards, please click on "Draw Histogram For ..." and select Variant Quality (QUAL),Read Depth (DP) or Mapping Quality (MQ), and a histogram and a plot with the accumulative proportion of the selected metric will be shown in the tool. You can save the plots in .pdf, .jpg or .png format by clicking on "Save Histogram As ...". Each time you draw a histogram, it will be shown in a new tab widget. You can select each axis of one plot to move, zoom in, zoom out using your mouse for better visualization.
Xenograft Data
In BRB-SeqTools v1.2, we implement a combined approach for the variant call of DNA-Seq data from patient-derived xenograft (PDX) models. The combined approach requires FASTQ files as an input. It first combines the human and mouse reference genomes into an artificial genome. The FASTQ files will be aligned to this artificial genome. Afterwards all reads mapped to mouse genome will be removed and the remaining aligned reads can be used in any variant call tool.
The xenograft tool can be accessed by clicking "Settings" -> "Analyze xenograft data". The new interface will be similar to the single species data except that users are required to create/select a mouse reference genome profile before running the analysis.
Tutorials
To help first-time users gain experience to use BRB-SeqTools, we provide two sets of test data including all necessary input files.. In addition, we also provide one step-by-step example on variant annotation analysis on VCF files containing human tumor data.
Test Data
In BRB-SeqTools, examples of running analysis tools on two small sets of NGS data are provided. If you start BRB-SeqTools and click on "Help", you will see two sub-menu items "Tutorial 1: RNA-Seq" and "Tutorial 2: DNA-Seq". Tutorial 1 contains a subset of RNA-Seq data from GSE11209 along with the genome reference files and a "samples.txt" file for you to download. After clicking on the submenu item, you will see the following dialog form.
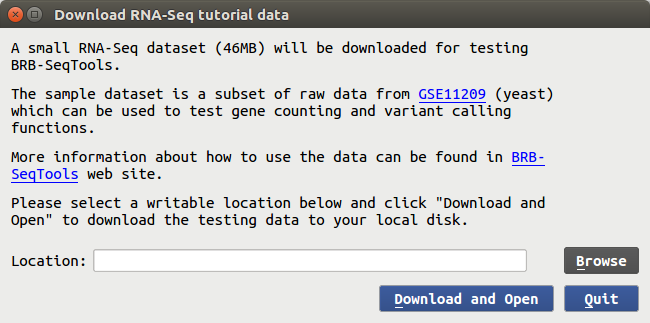
You can enter the download directory at your choice and then click on "Download and Open", and it will take less than five minutes to download the test data. A message will pop up to let you know when the download process is finished, and the input spaces at the main GUI interface of BRB-SeqTools will be populated, as shown below. You can simply click the "Run" button to start the analysis. It will not take a long time to finish the process of mapping, gene counting and variant calling.
Similarly, Tutorial 2 contains a small subset of raw DNA-Seq data from GSE48215 along with the required reference genome and the "samples.txt" files, on which the user can conduct variant calling analysis.
Variant annotation
We provide here a practical example for running the somatic mutation annotator. In this example, a raw VCF named lungcancer_L400T_raw.vcf was annotated by ANNOVAR and SnpEff, respectively. This VCF file was generated in BRB-SeqTools by running the variant calling analysis over one RNA-Seq dataset (GEO Series Number: GSE81089) collected from a patient labeled as "L400T" with lung cancer. The Tophat2 aligner and Samtools mpileup variant caller were employed, and this VCF file was associated with the genome build of hg38 from the UCSC data source. Below is the step-by-step instruction to run ANNOVAR or SnpEff by the use of lungcancer_L400T_raw.vcf:
- Click on “Tools -> Somatic Mutation Annotator” to launch the annotator.
- Please fill in all fields in the annotator:
- Select "Annovar" or "SnpEff" for the annotation method;
- Browse the directory containing one or multiple VCF files. Here we browsed a personal directory that contains lungcancer_L400T_raw.vcf;
- Browse the output directory to save outputted results;
- Please select “hg38” for the genome build.
- Input “50” for the minimal variant quality;
- Use the default value “10” for the minimal read depth;
- Input “50” for the minimal mapping quality;
- For first-time users, please click on the "Download" button for reference genome file to automatically download the reference genome (.fa) file associated with the selected genome build from the Illumina iGenomes website Please refer to the Variant Annotation Section for more details about the download.
- For first-time users, please click on the "Download" button for COSMIC VCF to automatically download the COSMIC VCF associated with the selected genome build. Please refer to the Variant Annotation Section for more details about the download. In this example, the version v76 of COSMIC VCF was used.
- For first-time users, please click on the "Download" button for dbSNP VCF to automatically download the dbSNP VCF associated with the selected genome build from the dbSNP database. Please refer to the Variant Annotation Section for more details about the download. In this example, the dbSNP VCF with build 147 was used.
- Click on “Run”. It may take a while when you are running ANNOVAR or SnpEff for the first time, since it needs to download the gene-based annotation and dbNSFP database files. When it has run successfully, please go to the specified output directory to take a look at the results. In this example, the results for the annotator via SnpEff are available here, and the results for the annotator via ANNOVAR are available here.
Command Line Interface
If you need to run the SeqTools program in a 'headless' way (without a graphical interface), you can run the command line interface (CLI) version of the programs seqtools_dge and seqtools_vc from a terminal. First open a terminal (keyboard binding is Ctrl+Alt+t) and cd to the directory containing seqtools_dge or seqtools_vc. A full list of arguments can be found by adding '-h' argument after the command:
$ ./seqtools_dge -h
Name:
	seqtools_dge - command line interface for gene counting in RNA-Seq data
                       (companion to GUI version of the BRB-SeqTools program)

Usage:	seqtools_dge DIRECTORY-NAME [Options]

Options:
        DIRECTORY-NAME                  Directory containing fastq files
	-h,--help                 	Show this help message
	--annotDir <string>       	Annotation directory
	--indexDir <string>       	(optional) Bowtie2 genome index files directory
	                          	If it is not given, annotDir will be used.
	--outputDir <string>      	Output directory
	--alignMethod <string>    	(optional) Alignment method (tophat/star)
	--countMethod <string>    	(optional) Gene counting method (htseqcount/featurecounts)
	--tophatDir <string>      	(optional) Tophat directory
	--starDir <string>        	(optional) STAR directory
	--bowtieDir <string>      	(optional) Bowtie directory
	--samtoolsDir <string>    	(optional) Samtools directory
	--htseqDir <string>       	(optional) HTSeq directory
	--subreadDir <string>     	(optional) Subread directory
	-p,--num-threads <integer>	(optional) Number of threads for the tophat program
	                          	Default is the number of hardware threads minus 1
	--samples                	(optional) Alternative file name of
	--biowulf <yes/no>        	(optional) Use NIH/Biowulf machines or not. Default is no.
	                          	If yes, generated scripts will be tailored to the swarm command used by
	                          	NIH/Biowulf
	--createScriptOnly <yes/no> 	Only create the shell script without running it. Default is no.
	--checkSoftware <yes/no>  	(optional) Check if the required software exist or not. Default is yes.
	-v,--version              	Display version number

$ ./seqtools_vc
Name:
	seqtools_vc - command line interface for variant calling and annotation
	              (companion to GUI version of the BRB-SeqTools program)

Usage:	seqtools_vc DIRECTORY-NAME [Options]

Description:
	Run variant calling or annotation for next-generation sequencing data.
	For variant calling, the input is a set of (DNA/RNA-Seq) FASTQ or (aligned) BAM files.
	For variant annotation, the input is a set of VCF files.
	The available alignment, variant calling and annotation options can be found in detail below.

	DIRECTORY-NAME            	Directory containing fastq/bam/vcf files.
	-h,--help                 	(optional) Show this help message
	--inputFormat             	(optional) Use fastq, bam or vcf as the input file format. Default is fastq.
	--outputDir <string>      	Output directory
	--alignMethod <string>    	(optional) Alignment method (tophat/star/subjunc for RNA-Seq,
	                                bwa/subread for DNA-Seq)
	--vcMethod <string>       	(optional) Variant call method .
	--markDup <yes/no>        	(optional) Use Picard to eliminate duplicated reads. Default is yes.
	--annoMethod <string>     	(optional) Variant call annotation method
	--annotDir <string>       	(optional) Annotation directory
	--indexDir <string>       	(optional) Bowtie2 or BWA genome index files directory
	                          	If it is not given, annotDir will be used.
	--tophatDir <string>      	(optional) Tophat directory
	--bowtieDir <string>      	(optional) Bowtie directory
	--starDir <string>        	(optional) STAR directory
	--subreadDir <string>     	(optional) Subread directory
	--samtoolsDir <string>    	(optional) Samtools directory
	-p,--num-threads <integer>	(optional) Number of threads for the tophat program
	                          	Default is the number of hardware threads minus 1
	--mem-picard <integer>    	(optional) Memory in GB for Picard program (mark duplication in variant
	                          	calling). Default is 20
        --realignIndel <yes/no>   	(optional) Realign indels for GATK variant call.
				        Default is no
	--indelVcfPath <string>    	(optional) VCF file with known indels (required for GATK pipeline)
                                        If this VCF file is same as the known SNPs VCF file, the indel only VCF file
                                        will be generated from the known SNPs (dbSNP VCF only)
        --recalBaseQual <yes/no>  	(optiona) Recalibrate bases quality score for GATK variant call.
				        Default is no
	--knownSnpPath <string>     	(optional) VCF file with known SNPs and small indels (required for
	                                GATK pipeline)
	--dataType <rna/dna>      	(optional) The data is from DNA-Seq or RNA-Seq (required for
	                                GATK pipeline)
	--annovarDir              	(optional) ANNOVAR directory
	--annovarDataDir          	(optional) ANNOVAR database directory
	--bcftoolsDir             	(optional) Bcftools directory
	--htslibDir               	(optional) Htslib directory
	--rawvcf                  	(optional) VCF file for annotation
	--dbsnp                   	(optional) dbSNP VCF file
	--cosmic                  	(optional) COSMIC VCF file
	--dbnsfp                  	(optional) dbNSFP database file
	--refGenome               	(optional) Reference genome FASTA file
	--build                   	(optional) Genome build version
	--min.qual                	(optional) Minimum call quality for variant filtering.
	--min.dp                  	(optional) Minimum number of reads covering or bridging the called
                                        positions for variant filtering
	--min.mq                  	(optional) Minimum mapping quality for variant filtering
	--rcodeDir                	(optional) Directory containing R code required for variant call analysis
	--samples                 	(optional) Alternative file name of
	--biowulf <yes/no>        	(optional) Use NIH/Biowulf machines or not. Default is no.
	                          	If yes, generated scripts will be tailored to the swarm command used by
	                          	NIH/Biowulf
	--createScriptOnly <yes/no> 	(optional) Only create the shell script without running it. Default is no.
	-v,--version              	(optional) Display version number
This program was built using GCC. The executable file should be able to run on most x64 Linux distributions.
If you only want to generate shell scripts without running them immediately, you can use the --createScriptOnly yes parameter in seqtools_dge or seqtools_vc. This can be useful in a situation that the scripts should be tweaked before being used; e.g. users want to run scripts through the qsub command in a batch system or on a cloud platform.
FAQ
- How much disk space is needed for my analysis? For paired-end reads, if the raw fastq file is X GB for each end, then the total required space is about 4X GB (2X for the fastq files, and 2X for the aligned and sorted bam files). For single-end reads, if the raw fastq file is X GB, then the total required space is about 3X GB.
- When I run automatic setup for software installation an error message shows up "Could not get lock /var/lib/dpkg/lock". What should I do? This is a known issue related to the Ubuntu OS. The occurred if the Ubuntu OS was just rebooted. A simple solution is to wait a few minutes and then re-run the tool.
- How about more advanced options? Under 'Advanced options' dialog window,
Advanced users can specify parameters in each tool for their need.
For example, the default options for HTSeq-count are given below
Options you may want to use include --no-coverage-search or -G in tophat where --no-coverage-search can be used if you see Tophat program is working on searching for junctions via segment mapping and consumes too much memory or time (see a screenshot below) and -G option is used to specify GTF file (eg -G genes.gtf).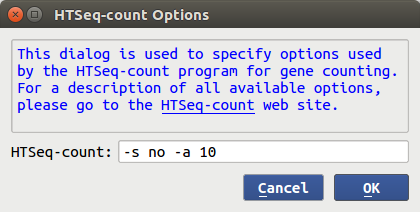
The option -s signifies that the data are not from a stranded protocol (this may vary by experiment) and the -a option specifies a minimum score for the alignment quality (i.e. all reads with alignment quality lower than the given minimum value will be skipped). The default is 0 for minimum score.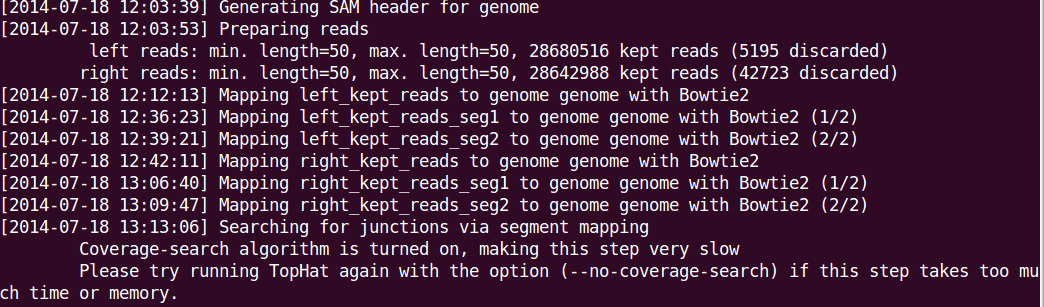
- How is this program different from Galaxy? Galaxy is a much more complicated system. There may be a big learning curve for general users, not to mention unexpected issues (tools availability/installation/management, upload data, quota limit, ...) when it is used. BRB-SeqTools is a simple application to allow people who have some experience with Unix/Linux to analyze RNA-Seq data without the need of a 'system administrator'.
- Is the program running in parallel? Several programs provide a multi-thread option to take advantage of multi-cores in CPU. BRB-SeqTools was designed to run Tophat, STAR, BWA and Samtools programs in parallel to reduce the run time. By default the number of threads is the total number of CPU cores on the system minus one. Since running programs with multithreads requires a significant increase of memory, sometimes the execution may be very slow because lack of memory. In such a case, users can specify '-p' parameter in Tophat program, for example, to decrease the number of threads.
- Can the program run on Amazon cloud? You bet. Make sure the Amazon Machine Image (AMI) used to create machines is based on 64-bit Ubuntu 14.04 and up.
- Can the program run in a cluster environment? Yes. We have tested seqtools_dge and seqtools_vc in the NIH Biowulf cluster and also Amazon Elastic Computing Cloud (EC2). With basic knowledge of batching system (NIH Biowulf) or Sun Grid Engine queuing system (Amazon Cloud), users can submit multiple jobs to run in parallel on clusters. See Running seqtools_dge and seqtools_vc in Clusters of Computers for more information.
- How to find the Tophat (and other) software version? Assuming required software is
installed under the default directory
/opt/SeqTools/bin, we can type the following in a Linux terminal to find out each software version:/opt/SeqTools/bin/bowtie2-2.2.1/bowtie2 --version # 2.2.1 /opt/SeqTools/bin/tophat-2.0.11.Linux_x86_64/tophat2 --version # 2.0.11 /opt/SeqTools/bin/bwa-0.7.12 # 0.7.12-r1039 # opt/SeqTools/bin/STAR-2.5.1b # 2.5.1b # opt/SeqTools/bin/picard-tools-1.141 # 1.141 /opt/SeqTools/bin/samtools-0.1.19/samtools # 0.1.19-44428cd java -jar /opt/SeqTools/bin/gatk/GenomeAnalysisTK.jar --version # 3.5-0-g36282e4 /opt/SeqTools/bin/bcftools-1.3/bcftools -v # 1.3 cat /opt/SeqTools/bin/HTSeq-0.6.1/VERSION # 0.6.1 ~/annovar/annotate_variation.pl # 2016-02-01 /opt/SeqTools/bin/sratoolkit.2.3.5-2-ubuntu64/bin/fastq-dump --version # 2.3.5 /opt/SeqTools/bin/FastQC/fastqc -v # 0.10.1 /opt/SeqTools/bin/fastx/bin/fastx_trimmer -h # 0.0.13 java -jar /opt/SeqTools/bin/snpEff/snpEff.jar -version # 4.2 R --version # 3.3.0 pandoc --version # 1.16.0.2
- How come it does not work when I run it on a virtual machine when 'Try Ubuntu' option is used? BRB-SeqTools works on virtual machine but it does not work under Ubuntu live mode (default option when booting from CD). Live session differs from a regular operating system. It has a very limited file system space and you will get an error when software (Tophat et al) are being installed. So please use 'Install Ubuntu' instead of 'Try Ubuntu'.
- The download speed is very slow when I work in a virtual machine environment. Is there anything I can do to improve the speed? VirtualBox provides several options for the network adapter type. When the virtual machine is off, select your Ubuntu virtual machine -> Settings -> Network. Click 'Advanced' on Adapter 1 tab. Change the default 'Adapter Type' from the default to 'PCnet-Fast III' or 'Paravirtualized Network'. Click 'OK' and re-start the virtual machine.
- I got an error when I ran install.sh. Running the bash
script install.sh requires root privileges.
If you don't have root privileges, you will get the following error when you run
install.sh script.
$ ./install.sh
[sudo] password for brb:
Sorry, user brb is not allowed to execute 'bin/mkdir -p /opt/SeqTools/bin/SeqTools'
as root on brb-VirtualBox.
A simple solution of adding an existing account with root privileges is to run the following terminal command from an account with root privileges,sudo adduser brb sudo
PS. 1. 'brb' has to be replaced with a real user name which does not have sudo privileges yet. 2. The user needs to log out and log in again to see the effect. - OK, I got the count files successfully from BRB-SeqTools. How do I transfer the count table
files to Windows OS for BRB-ArrayTools?
One simple solution is to use a flash drive to copy the zip file from working directory in Ubuntu to a
Windows machine.
If you would like a more elegant way to transfer the file, you can download a program called WinSCP
on Windows machines and use it to transfer files between Ubuntu and Windows machines. Before you use
WinSCP, you need to know the IP for the
Ubuntu machine. You can easily find out the information by using the ifconfig command
on a terminal
ifconfig eth0
where the 'eth0' argument represents the first ethernet adapter. The IP address should have a format XXX.XXX.XXX.XXX. You need to enter the IP address in the 'Host name' entry of a dialog when you create a new connection session on WinSCP. - I got an error when running the Tophat program. What could be the cause of the error? Take a look at the tophat output directories. Look for the file tophat.log. The log file should give you a hint about the problem. For example, if the log file shows an error for fastq record SRRXXXXXX.YYYYYY, check the fastq file SRRXXXXXX.fastq. If the file was copied from another machine or downloaded from the internet, use some tools like md5sum to find out if there is any discrepancy in md5sum values.
- I got an error message: there is no package called 'rmarkdown'.
Variant calling requires the installation of R and the R package rmakrdown.
If you have run Tools Manager > Automatic Setup before but
get this message now it is possible you have upgraded R recently (e.g. R 3.2.x to R 3.3.x). In this
case, you should run the following
command to install the rmarkdown package for the new version of R.
$ sudo su - \ -c "R -e \"install.packages('rmarkdown', repos='https://cran.rstudio.com/')\"" - I still need HELP: Email to arraytools@emmes.com.